THE SANDMAN COMETH & THE ART OF SANDING
- Nov 22, 2023
- 10 min read
Despite what may be trending online, sanding of any variation will always have a time and place. Yes, you read that correctly. Indiscriminately rubbing a piece of sandpaper over paint, particularly if handled by someone who possesses little to no experience, can and will inevitably result in an insurance claim and a new paint job.
So before you develop a cavalier attitude towards the subject, I suggest you use this article as a guide. If this is your first foray into the many different subtleties of sanding, I would highly encourage you to practice on used panels from your local junkyard before you make the ascension into full-bodied vehicles.

Any prerequisite to sanding should involve the utilization of tools and resources that are specifically formulated to handle jobs that can effectively lead to a desirable outcome, meaning that it isn't enough to rely on a bucket of water and a generic grit of sandpaper. Naturally, I'll elaborate on these options in more depth as this article progresses.
Moreover, you need to be pragmatic in your approach because while there may be more than one way to achieve a desired outcome, any said outcome should come with the least amount of damage inflicted to the surface. In this industry, I hate to be brusque, but this process is the personification of the phrase " Use the least-invasive method in order to get the job done".
Traditionally, it's always advised to limit oneself to sanding vehicles which possess aftermarket paintwork versus mass-produced, or factory-level finishes. Why, do you ask? It all boils down to one word, material. On average, at least for vehicles which were manufactured after the "golden age" (1977-1991), as it's affectionately known, basecoat/clearcoat systems have become progressively thinner over time. As I alluded to in another article, some manufacturers are producing finishes (urethane-based) which claim to be more chip-resistant, but never live up to their claim.
Again, you're fluctuating between 2-2.25 mils worth of clearcoat, which is already thinner than a post-it note. This earth-shattering statistic alone means that placing your vehicle into the hands of a qualified technician is vital to the preservation of a newer vehicle.
There's a clear distinction between these two categories, but once you're handed a vehicle with a factory-level finish, the margin for error is so infinitesimally small that the probability of making a soul-crushing mistake is high, very high. No one wants to burnish through any form of a finish, regardless of make or model. Now, this doesn't account for vehicles of the import, hypersport, or high-end persuasion, but that's a different story and another cup of coffee.
Everything aside, it's fair to say that any subset of sanding can be conflated into one broad skill set. Whether you choose one over another is entirely up to the operator and the end product, which is my segue into introducing each category and how it might fit into your unique set of circumstances.
Hand Sanding
Considered by many to be the most invasive of all sanding platforms, hand-sanding requires finesse, a calculating eye, a sense of kinesthesis, and above all else, experience. Whilst it may carry a wider scope of application, hand-sanding can be carried out in one of two fashions.
One, as long as the owner is willing to invest the time and energy, that individual could spend hundreds upon hundreds of hours perfecting one vehicle. If your expectation is to accomplish a flawless finish, hand-sanding offers the benefit of producing the pinnacle of glass-like reflections and the satisfaction of knowing that any irregularities in the texture will be virtually non-existent. Mind you, this approach should not be used for vehicles that carry a factory-level finish i.e., Honda, Toyota, Nissan, Kia, etc.
On the other end of the spectrum, hand-sanding might require a simple "isolated" approach, whereby one removes only a handful of irregularities and/or blemishes. The benefit of this method is that you'll eliminate the need to impact a larger surface area, and depending on the circumstances, you might be able to achieve your desired results on even a mass-produced finish.
Below, (Fig. 1) you'll find a prime example of what I like to call the "isolated" approach. In this particular case, a client that possesses a Dodge Ram 1500 Classic had suffered a crushing blow to their hood as a result of a punishing ice storm that had swept across the area.

Fig. 1 DODGE RAM 1500 CLASSIC AFTER EXAMINATION
Much to the dismay of the owner, they'd parked their vehicle beside a mature oak tree with a set of low-lying limbs arching over the front half of the vehicle. Subsequently, one of the limbs had cracked at the height of the storm causing it to drop onto their hood. Rather than dismiss the project altogether, I chose to gauge how much material was on the surface. After using a dedicated paint depth gauge, the diagnosis was in favor of the owner. Simply put, there was enough material which warranted the use of sanding.
Now is the time where I'll revert back to the initial statement I made concerning factory-level finishes. Truth be told, an overwhelming majority of manufacturers can tolerate hand-sanding using 1500 to 3000-grit sandpaper. This is what I like to call the "safety zone". By definition, these 4 grades of sandpaper will enable you to preserve roughly 85-90% of the existing clearcoat whilst simultaneously removing any deep imperfections.
You might be asking yourself "Okay, so how does one execute this process?" "What technique are you using?" "How do I know when I've reached the end of the sanding stage?" All of these questions will be answered in the latter half of this article, so sit tight.
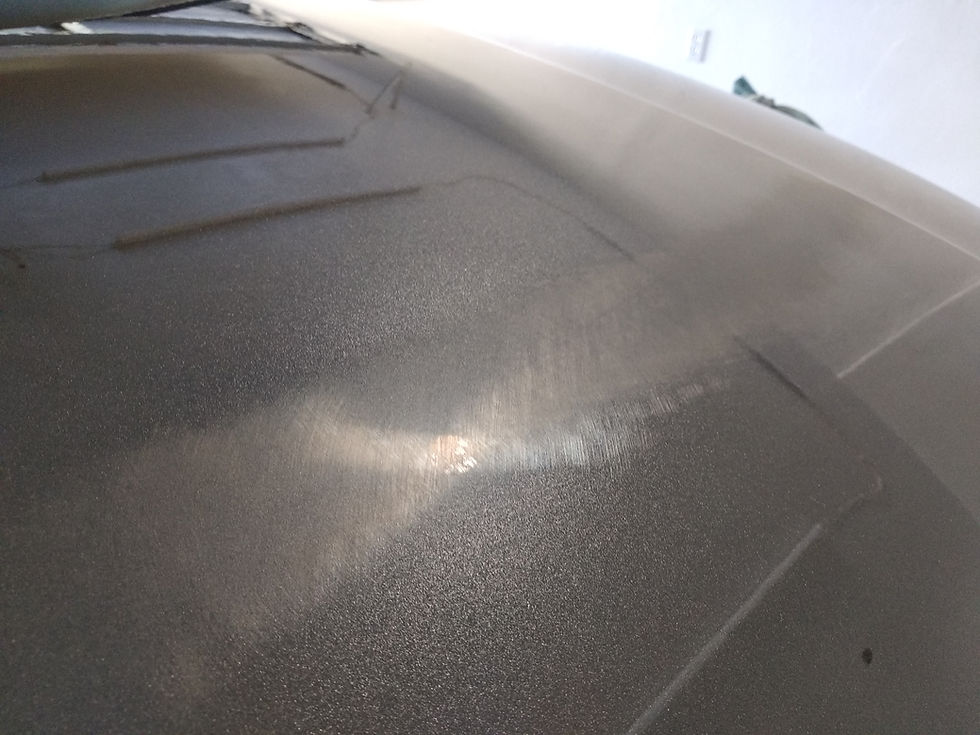
Fig. 2 FIRST-STAGE RESULTS AFTER USING A SINGLE SHEET OF 2500 WET/DRY SANDPAPER
After the first stage of treating the initial defect (Fig. 2) you'll see that in conjunction with an interface block (backing pad), a dedicated form of lubrication, and a single sheet of Nikken 2500-grit sandpaper (link provided), we were able to create a nearly uniformed, yet opaque finish. Mind you, this was only after the first stage and after we finished using 3000-grit, the edges of the affected area were uniformed. In essence, this is what you need to achieve in order to maximize results. More importantly, feathering-out the affected area by roughly 1/4 inch will ensure that the polishing process will become seamless, thereby allowing for even heat distribution when removing any sanding marks with a dedicated polisher.
Once we finished the polishing stage (Fig. 3), you'll see that not only were we able to diminish the unsightly appearance of the hood, but we removed the blemishes entirely. As you can clearly see evidenced through the aforementioned photographs, stellar results can still be achieved even when faced with factory-level finishes. Is it to the same degree as an aftermarket finish? No, but our goal was to remove the initial defect and that's the only thing the owner cared about.

Fig. 3 RESULTS OF DODGE RAM 1500 CLASSIC
Among all of the processes associated with rectifying this defect, the one that carries the most dominance is the preparation that's made before making contact with the clearcoat. One needs to ensure that the paintwork is free of any surface-level contaminants. Why, do you ask? When the time comes to graze that piece of sandpaper across the surface, you don't need to suffer unduly by trapping any foreign substances between the face of your sandpaper and the clearcoat.
If it should, you'll hear a sound comparable to fingernails running across a chalkboard. If that should happen to you, stop and submerge your sandpaper in a bucket of lukewarm water, mixed-in with a few drops of your preferred automotive shampoo. In fact, when you couple this approach with a form of lubrication, you're guaranteed to produce a smoother finish and dust particulates will be less-likely to affect your health.
In conclusion, hand-sanding has its place. While it may be tempting to reach for a sheet of sandpaper on your daily commuter, ask yourself these two questions "Is this completely necessary?" and "What's my objective?" If you can justify these questions with sound reasoning, then reaching for sandpaper may serve as a viable solution.
Machine Sanding Part A
While not in all cases, machine sanding can be interpreted as the "expedited" form of finishing paintwork. Members of the body shop and collision repair sector, we share a common thread. Whether you're using a dual-action polisher or even an air-based tool, machine sanding ensures an even application of sanding marks instilled throughout the finish, thereby producing a brilliant finish without committing oneself to hundreds of hours of labor-intensive scrutiny behind a single block of grit.
As any prerequisite to machine-sanding, using the right formulation of grit from the outset is your key to maximizing results. As as prime example, let's take a look at a 1965 Mustang Fastback that received an extensive wet-sanding treatment, which began by applying 1500 grit wet/dry sandpaper by hand whilst executing what's known as the "cross-hatching" pattern.
Once we completed the initial step of using 1500 grit wet/dry sandpaper, we then proceeded to the next stage which was to apply 3000 grit wet/dry sandpaper disc via an orbital-based air tool. Last but not least, the sanding process was finished by applying 5000 grit wet/dry to the area. Theoretically speaking, the finer the granulation that's layered over the other, the greater the reward with regards to an ease of polishing and the deeper dimension of glass-like reflections. Of course, others may disagree but based on the anecdotal evidence supplied, the results speak for themselves (Fig. 4).

Fig. 4 RESULTS OF 1965 MUSTANG FASTBACK
Machine-Sanding Vs. Hand-Sanding
When it comes to the "cross-hatching" method, your primary objective is to follow an initial path at either a 45 or 90 degree angle, which is entirely dependent on the operator and the degree of severity concerning the defect. Subsequently, your next path of motion should follow in the opposite direction. In essence, you're creating an X-shaped formation.
While this may be reserved for someone of a higher skill set, this approach allows for an even distribution of coverage to the affected area, even when addressing defect-free paintwork. In fact, for businesses like ours who put their blood, sweat, and tears into one vehicle, this method also helps to lay a foundation where any step that precedes the following can be clearly monitored, which in turn allows for a seamless polishing stage and a laser-like reflection can be achieved.
The fundamental difference between this approach and the straight-laced motion associated with machine-based sanding is that machine-sanding should be carried out in a linear fashion, or what the detailing world dubs the "cross-hatch" pattern. I know what you're thinking, "Aren't you speaking of the same method?"
In fact, there's a clear delineation between the two methods, but with "cross-hatching" you're opening the door to more than one path of motion, whereas "cross-hatch" is strictly executed using a north to south, and east to west pattern. Trust me, the last thing you want to do is scour the surface with circular motions using an orbital-based tool.
Methods & Approach
As promised, I'm now going to lead you through a rough tutorial on approaching the "isolated" method versus its machine-based counterpart. Not to sound like a broken record, but working clean creates what I like to call a "secondary insurance policy." If you should have the time, supplement your sanding with a bucket of lukewarm water mixed-in with a few drops of a dedicated shampoo. The added lubrication will greatly reduce the odds of instilling pigtails or other user-created blemishes.
As with any hand-sanding technique, it's considered standard operating procedure to wrap your sheet of sandpaper around an interface pad or cushioned block. The cushion supplied will not only allow for an even distribution of weight applied to the surface, but will intensify the proprioception in the brain to determine when the sanding cycle should stop. You aren't in control of your proc
The initial step always determines the outcome of the project. While it might be different for others, one needs to be 2x-3x more cautious when using a lower grit. As I've preached to my clients time and time again, handling anything that requires a longer learning curve should be done in an inconspicuous area.
With your dedicated sheet of sandpaper, ensure that it's securely wrapped around your interface pad. When I mean it should be securely wrapped, I mean tight enough so that your sheet conforms exactly to the shape of the interface pad. The best analogy I can draw from regarding making contact with your paintwork is thinking of a grip comparable to holding a putter. For all of you golfers out there, I hope you can make a connection. With that in mind, your stroke should be smooth, not only addressing the affected area, but should carry roughly 1/4 inch outside of that boundary. By doing so, you're ensuring an even cycle rather than risking an abrupt motion increasing the potential for deeper sanding marks.
After 8 passes (1x pass being forward and back), dry your area with a clean microfiber towel and inspect your area. If you see a universal opaque finish, then that's an indicator of not only removing the blemishes but should also serve as a benchmark for also removing orange peel. In the opposite direction, advance to your next level of grit using the same method. Choosing any subsequent level of grit will be entirely dependent on the circumstances and the challenge presented to you.
If there's any piece of wisdom I can impart, it's that taking your time is the key to conquering your paint-related challenge. Speed kills, so consider this to be a form of meditation. As cited in specific examples outlined above, the finer the granulation, the more pronounced your sheen will appear. While you could use a granulation higher than 7000 grit, anything above 5000 grit might be superfluous in a majority of cases.
Last but not least, if the area you're addressing happens to fall near an edge, consider the risk of burnishing through your finish. Statistics show that the thickness of paint drops significantly when approaching edges. If this is the case, the general rubric to follow is to keep at least a thumb length between the edge and the end of your sanding stroke.
Final Thoughts
Sanding isn't a one-size fits all activity. Every project that revolves around sanding should be handled with a judicious mindset and careful planning. If the desired outcome doesn't come into fruition, then you need to know when to stop. After all, there's only so much one can do with a surface without demanding the need for a body shop to respray a panel.
Even if your levels of improvement are negligible, you should still find reason to congratulate yourself. As we alluded to in an earlier part of this article, we're in the business of creating beauty. While a majority of our experience lies in staging rare makes and models both at home and abroad, our primary focus is achieving beauty on a wide spectrum. Naturally, we're here to help in any capacity. If you should have any questions or concerns related to this content, we encourage you to contact us and we'll be more than happy to assist.


Comments