WHEELS 101 | A GUIDE TO WHEEL REFURBISHMENT
- Nov 28, 2022
- 9 min read
Updated: Dec 1, 2022
Wheels, they're an indispensable component that gives us reason to drive and personifies our driving experience. Regardless of variety or material, your wheels will inevitably fall into some form of a disheveled state. Curb rash, clearcoat failure, oxidation, and the despicable rock chip are just a few of the disfigurements that one can face whilst driving. What's worse, is that sometimes even the most hypercritical of car owners can be oblivious to any and all changes until significant damage starts to materialize.
The purpose of this post is to help you identify the problems that are predominantly found within the arena of wheel restoration, troubleshoot them appropriately according to your particular needs, and find a resolution that opens the door to a long-term solution. Please note, any and all solutions shall indemnify Blackstone Detail and should only be used with sound judgement prior to execution.
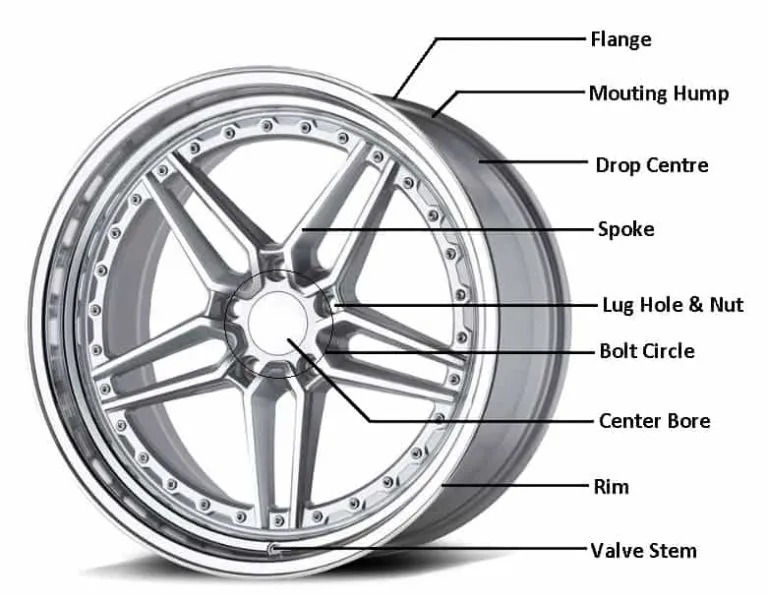
FIG. 1
DIAGRAM OF A BESPOKE BILLET WHEEL AND ITS RESPECTIVE PARTS
Part A | Curb Rash
The most common form of wheel defacement is that of curb rash. If you're unfamiliar with wheel jargon, curb rash can easily be discerned by the series of scratches, which can either sink into as deep as the substrate or you could be lucky enough to only suffer superficial scratches that rest on the surface which barely eat into a portion of the clearcoat. In either case, it's always best to proceed using the least-invasive method so as not to warp the outer flange, thereby leaving the wheel unbalanced. You don't want to become a statistic on the road just because you wanted to chase perfection. A set of illustrations below showcase two examples of curb rash, with the first concentrated on the outer flange and the other on the wheel face.

FIG. 2
ILLUSTRATION OF CURB RASH LOCATED ON THE OUTER FLANGE

FIG. 3
ILLUSTRATION OF CURB RASH LOCATED ON THE WHEEL FACE
When assessing any damage, the first step is to simply take your thumbnail and graze it over the surface of the affected area. Now, when I say graze your thumbnail across the surface, I don't mean a simple swipe from left to right. More specifically, you should move it in every direction to determine its depth whilst simultaneously feeling for any other irregularities. In this way, you can formulate a plan of action to determine what level of repair should be executed.
If after you assess the condition and determine that the affected area stretches deeper than your thumbnail, you should come to the realization that the amount of labor will require the use of a metal-based putty, in addition to a traditional primer and clearcoat. Please note, any damage incurred that stretches beyond the point of a metal-based putty should make it a priority to replace the wheel at their earliest convenience. Do not, under any circumstances, continue to drive with significant damage that might compromise the safety of the driver or any passenger if the damage should be concentrated on the outer flange.
Part A | Troubleshooting & Solution
So, let's just say that the worst-case scenario had befallen you and you're now fraught with the most labor-intensive solution to curb rash. Great, now what do I do? Take a deep breath, because you'll be pleasantly surprised to find out that your solution will be easier to rectify than one initially thought.
Step 1
First and foremost, it's imperative that you rid the affected area of any contaminants that might be resting on the surface. Give your wheel a thorough bath, which should include the use of a dedicated wheel cleaner. If you should already have one in your arsenal, all the better. If not, then I'll be sure to add a list of products at the bottom of this article that will facilitate your needs.
Step 2
Not unlike suturing a cut on your skin, it's best practice to completely sterilize the area. Once the surface has been thoroughly cleaned, it's of the utmost importance to use a dedicated degreaser to remove any residual remnants of polymers, silicone, or any other foreign substances that may still be resting on the surface. As an additional preventative measure, use a tack cloth to finish the cleaning and preparation process.
Lastly, mask-off the sidewall of the tire from the wheel flange so as not to introduce any form of cross-contamination, especially when it comes time to apply any solvent-based paint. Masking can be done with a conventional roll of masking tape or with an alloy masking wheel system. Links to these products will be listed at the bottom of this article. Alternatively, you can employ the use of index cards, newspaper, or even easily pliable sections of thin cardboard.

FIG. 4
ILLUSTRATION OF A FINISHED MASKING OF THE TIRE FROM THE WHEEL
Step 3
Mind you, step 3 is considered the most time-consuming portion of the wheel refurbishment process, so when in doubt, take your time to ensure an optimal result. If the affected area should only contain minimal amounts of wear, you can begin using various grades of dry sandpaper starting with 180 grit dry sandpaper. Contrarily, if any imperfections such as rock chips and gouges should be present, that is if they're located on any portion of the wheel other than the lip or outer flange, you need to reach for a metal-based putty.
A metal-based putty can be applied much like that of Bondo, where a tw0-part system of resin and hardener is mixed. Once thoroughly mixed together, simply apply it to the affected area and let it dry according to the manufacturer recommendation. Once dry, sand with either 80 or 180 grit sandpaper until the affected area is flush with the surrounding area of the wheel.
Now, if you're tackling the same level of imperfections with a magnesium or aluminum-based wheel, the only way in which you can achieve perfection is to sand with a similar grit of sandpaper until all imperfections are non-existent. Ultimately, we're focusing our attention on the most commonly used aluminum alloy, so I'll be elaborating on aluminum wheels in the next section covering clearcoat failure and oxidation.
If you should have experience using high-powered machines, you should reach for a rotary polisher with your grade of sandpaper attached to the backing plate to expedite the process. At a slower speed of 600-800 rpm's, work your way around the wheel until you've removed a majority of your blemishes. Of course, this isn't the only method upon which you can achieve great results, so if you're more price conscious, you can apply the same process by hand via folding the grade of sandpaper in half or attaching it to a backing block to ensure a secure grip and added traction.
After you've completed the first stage within the sanding process, you should see a noticeable difference in the appearance of your wheel. For reference, an illustration below shows this difference.

FIG. 5
ILLUSTRATION OF RESULTS AFTER USING 180 GRIT SANDPAPER
As you can see, the initial sanding process leveled-off and removed an overwhelming majority of defects that once existed. If you're worried about the two distinctive colors that are now present, don't be! This is the result you should be targeting. The darker color above represents the primer or basecoat that has now been exposed. Once you're finished with your initial stage of sanding, it's time to introduce a higher grit of sandpaper. Wait, a higher grit? Why? In order for us to achieve a uniformed finish, it's imperative that we refine the finish so that the repair looks as inconspicuous as possible. For those who are novice to sandpaper methods, the higher the grit. the finer the scratches the sandpaper will produce.
With that being said, it's time to graduate over to 320 grit. Upon the second wave of sandpaper. you should start to gradually move away from the initial affected area. which is where the act of refinement begins. This step is also referred to as "feathering". Again, there's no need to become overzealous so touching an area that stretches even 1/8th of an inch outside of your damaged area should be more than sufficient.
Now it's time to graduate over to 400 grit. With this grit of sandpaper being your penultimate stage before applying primer. be sure to concentrate on blending-in as much as you can prior to your last step. Believe it or not, it's the second to last step that determines how smooth your product will come out.
As an addendum, the best way to gauge when it's appropriate to move onto the next grade of sandpaper is to look at the difference in finish between stages, whilst also grazing your hand across the surface to feel the varying degrees of smoothness.
Last but not least, it's time to take out a piece of 600 grit wet/dry sandpaper to finish. As the name suggests, this piece needs to be accompanied with some form of water. Now, there's no scientific formula as to how much water should be used, so feel free to use it liberally. Once the sanding stage is complete, it's time to run another piece of tack cloth against the wheel to ensure a smooth and contaminant-free finish.
Step 4
As soon as the wheel has completely dried, grab a wheel-based primer and apply 2 even, light coats. For those of you of the professional painting persuasion, I know you have a trusted spraying unit, so I need not elaborate on the subject.
However, if you should fall into the category of novice, you can still achieve great results with the use of an aerosol-based paint. When applying, allow yourself at least 6-8 inches of space between your hand and the wheel, so as to avoid any unnecessary drips or runs. Again, all coats should be handled with a certain level of patience, which is why it's best to etch-in coats that are light and even. At the end of the day, patience will yield the greatest reward.
Tip
Rather than aiming directly at the wheel, begin spraying just beside the surface being applied. When done in this fashion. you can be reassured that you'll gain an even distribution of paint rather than suffering an uneven blast from the outset.

FIG. 6
ILLUSTRATION OF ALUMINUM ALLOY WHEEL BEING PAINTED USING AIR-SPRAY GUN
Depending on the manufacturer of primer, it's best to allow for a window of 20-30 minutes before applying a second coat. Once the second coat has dried, then it's time to level any uneven finish that might be resting on the surface by using a piece of 400 grit wet/dry sandpaper, coupled with a spray bottle filled with water. Mind you, this process should be used with light pressure since you're only shaving-off any irregularities. Prior to any application of clearcoat, ensure that the surface is smooth to the touch whilst also being free of any contaminants. If desired, run another tack cloth to sterilize the surface.
Since I always err on the side of caution, applying 2 layers of clearcoat will help to ensure a prolonged life of the wheel. As a general rule of thumb, wait anywhere between 24-48 hours after your last coat is applied so that any solvents have an opportunity to evaporate and completely cure.
Part B | Clearcoat Failure
Much like that of your vehicle's paintwork, your wheels are highly susceptible to clearcoat failure. Moreover, if any part of your wheel system is neglected for an extended period of time, you should expect to see significant signs of wear and tear. Without the use of a zombie-like, time-eating methods like sanding, you can think about only applying an aircraft stripper to break away any existing failed clearcoat.
With a traditional aluminum alloy wheel, the least-invasive method to removing any loose or failed clearcoat is to use a seasoned microfiber towel. If any stubborn areas should be left behind, you can simply apply as many coats as desired until any remaining pieces have been completely removed.
If you should possess a bare aluminum wheel with significant damage including onset rust, you can proceed with a slightly different approach. Assuming you're a DIY warrior and you want to chase perfection, you can employ the use of a brass-wired brush to remove any residual pieces left over from the first application of aircraft stripper.
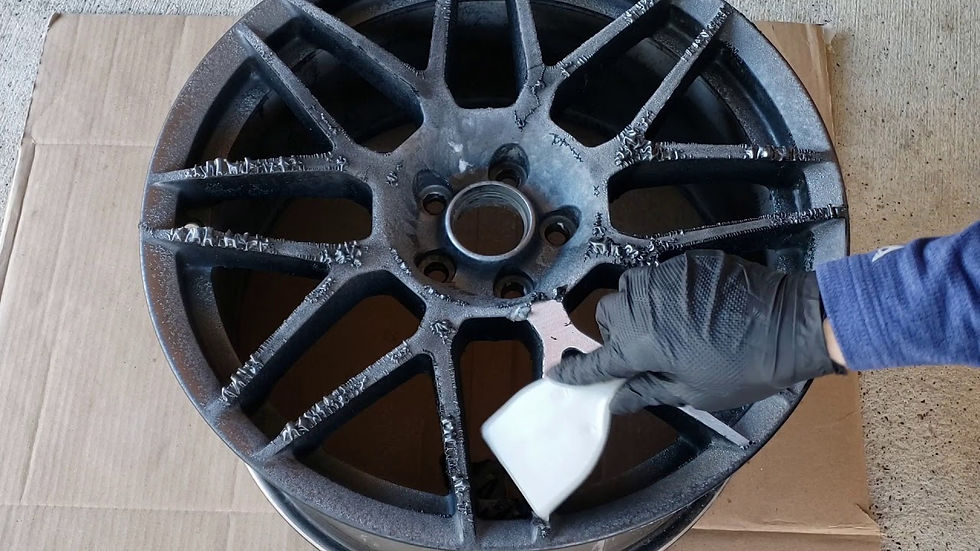
FIG. 7
ILLUSTRATION OF ALUMINUM ALLOY BEING STRIPPED OF BOTH CLEARCOAT AND PAINT

FIG. 8
ILLUSTRATION OF BARE ALUMINUM WHEEL BEING STRIPPED OF FAILED CLEARCOAT WITH BRASS-WIRED BRUSH
Part B | Troubleshooting & Solution
Once the old clearcoat has been stripped, you can then reach for multiple grades of dry sandpaper beginning with 180 followed with 320, 400, and finally 600. After the finish has been refined, then you can opt for a polishing kit of varying compounds. If you should have a preferred tool of choice to get the job done, then I need not intervene. However, you can achieve great results with even the use of a traditional drill. Again, products to facilitate this method will be listed at the end of this article.
Lastly, a mag or aluminum polish of any description will serve its purpose, but if you're hoping to bag a competition-ready aesthetic, time will be your best ally. Trust me, it's a time-consuming task. In this day and age, many are opting for a powder coating alternative since the DFT, or dry film thickness is substantially thicker than that of a traditional-based clearcoat. Then again, who am I to judge? If you want to safeguard your recent polishing work and you're a purist at heart, I might also suggest reaching for a wheel-specific ceramic coating.
Products & Supplies
Wet/Dry Sandpaper Set (120-3000)
Masking Tape & Wheel Masking Kit
Tack Cloth
Metal Putty
Wheel Primer
Wheel Aerosol (lacquer-based)
CONTACT VHT CUSTOMER SERVICE FOR CUSTOM COLOR AVAILABILITY
Wheel Clearcoat
Aircraft Stripper & Clearcoat Removal
Aluminum Polishing Compound Kit
Aluminum Polish


Comments